For some reason, it’s been a bit hard to find information on how to setup my particular fiber ONT so that it can survive a power outage with a PoE setup.
While of course, one could power a whole house with solar and batteries, I wanted to find a way to keep my fiber ONT and router powered during a power outage without having to invest in a full home battery system.
Costco recently
had on sale a small EcoFlow RIVER 3 Plus Portable Power Station, which I installed into my home network setup with the power station being next to my router.
It’s been wonderful as an UPS!
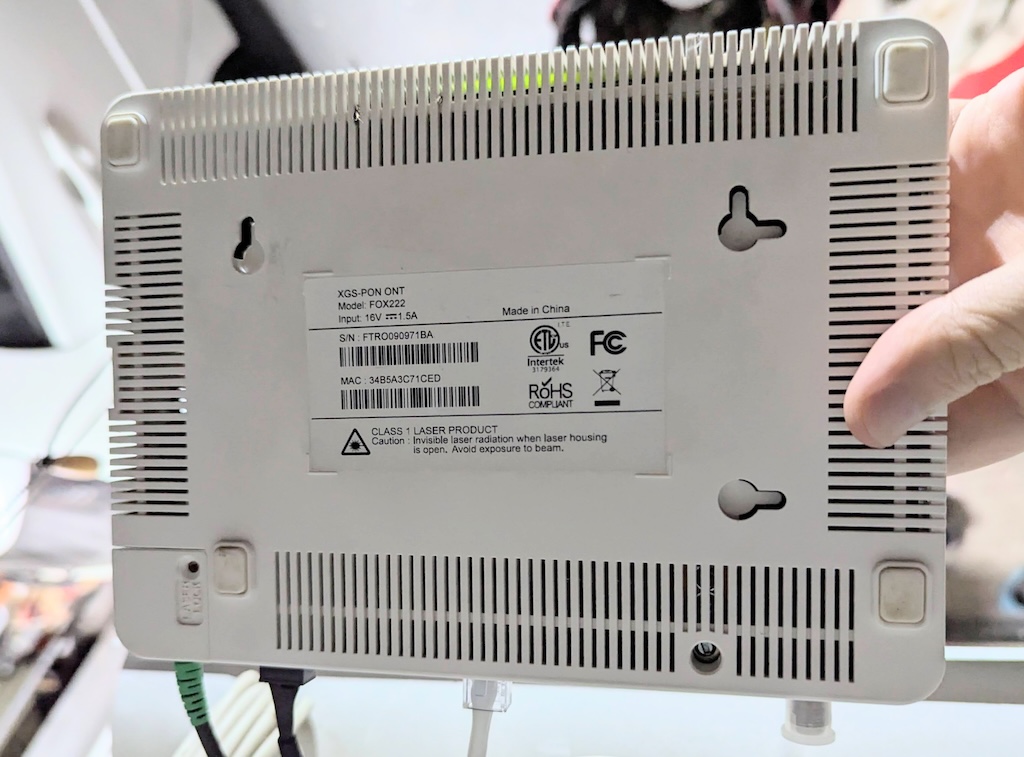
My setup is a bit peculiar as my Frontier FOX222 ONT is a bit far from the power station, but the power station is next to the router and there is an Ethernet cable running from the ONT to the router. The RIVER 3 is also next to the router.
The only way to provide power to the ONT without also having to plumb AC backed by the power station: A PoE injector on the Ethernet cable between the ONT and the router and a splitter at the ONT end to convert the PoE to 16V DC power for the ONT.
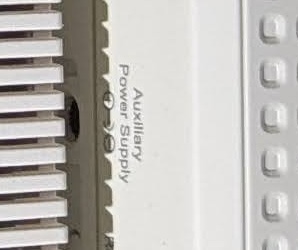
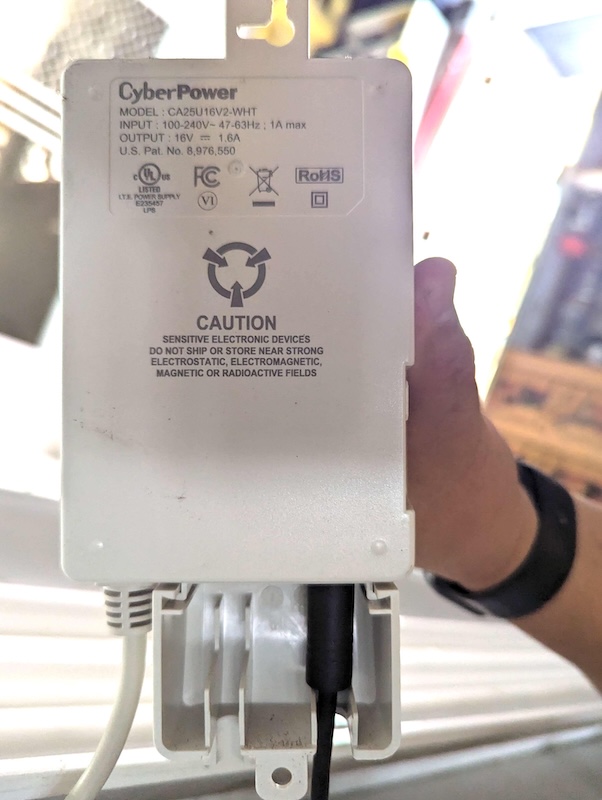
The FOX222 ONT is powered by a 16V DC power supply. There is an “Auxiliary Power Supply” port on the side of the power supply. Unfortunately, there is no printed information on what acceptable inputs are acceptable for this port. Nor is there documentation on the power supply itself on acceptable voltages. And size, that took forever and was inconsistent.
Information is also a bit scattered and/or some people have done permanent modications. Some
sources have even said 12V is all you need but this is wrong! The information may be applicable to a different ONT model.
Through some trial and error and quite some Amazon returns, I’ve have an Amazon checklist of the requirements for what is needed.
My environment:
- Frontier FOX222 Fiber ONT (Optical Network Terminal)
- Cyberpower CA25U16V2 Power Supply
Requirements:
- You need a PoE injector that can provide at least 30W. The power supply itself at the end of the chain is rated for 16V at 1.6A but it is unlikely to use the full 1.6A.
- You need a PoE splitter that can provide 16V DC output or something close to it. The FOX222 ONT requires 16V DC input. It will not run with 12V DC input. The 18V DC output is within range and works.
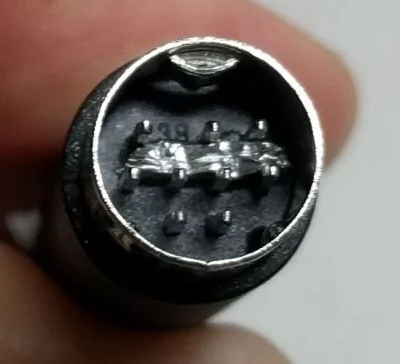
- The power supply connector has a DIN-like connector on one end. It must be modified so that when there is no AC power, the ONT will still power on and provide data.
- The “Auxiliary plug to the the power supply is a 4.0mm x 1.7mm barrel connector. I don’t know why some some sources say it’s a 4.5mm x 3.0mm barrel connector. Or
have other bizzare sizes such as “1.3mm x 3.5mm”.
- You’re adding some Ethernet cable segments. Some small thin cables is fine.
Installation:
- Plug the PoE injector into the wall and connect it to the router on the WAN side. Use the short Ethernet cables to add small segments as needed.
- Connect the PoE splitter to the ONT on the other end of the Ethernet cable. Use the short Ethernet cables to add small segments as needed.
- The LINOVISION PoE splitter has a 5.5mm x 2.1mm barrel connector male as an output. Connect it to the PoE adapter’s cable with the 4.0mm x 1.7mm barrel connector.
- Plug the 4.0mm x 1.7mm barrel connector into the “Auxiliary Power Supply” port on the Cyberpower CA25U16V2 power supply.
- Take out the wire between the ONT and the power supply and modify the plug as shown in the image above. This is done by stuffing in a small piece of aluminum foil into the barrel connector. It apparently shorts some pins together to allow the ONT to power on and provide data when there is no AC power.
- Unplug the AC cord from the Cyberpower CA25U16V2 power supply.
- Plug in the DC barrel connector into the power supply’s “Auxiliary Power Supply” port.
- It should power on!
- Do not plug in the AC cord! as if you plug it in, the ONT will reboot. This is actually bad. If the AC power goes out, the ONT will reboot. Just leave it powered by the DC power supply exclusively and from the PoE injector.
Setup Image:
Operation:
- Leave the AC cord from the power supply unplugged. If you plug it in, power outages will disrupt service. You’re welcome to test this yourself once you have the setup working completely on DC power.
Things I don’t know:
- Does this work the with the FRX523? It’s apparently some sort of successor to the FOX222.
- Will there by long term issues with the ONT being powered by a 18V DC power supply?
Comments:
Questions and suggestions are welcome to https://bsky.app/profile/mindflakes.com .
References:
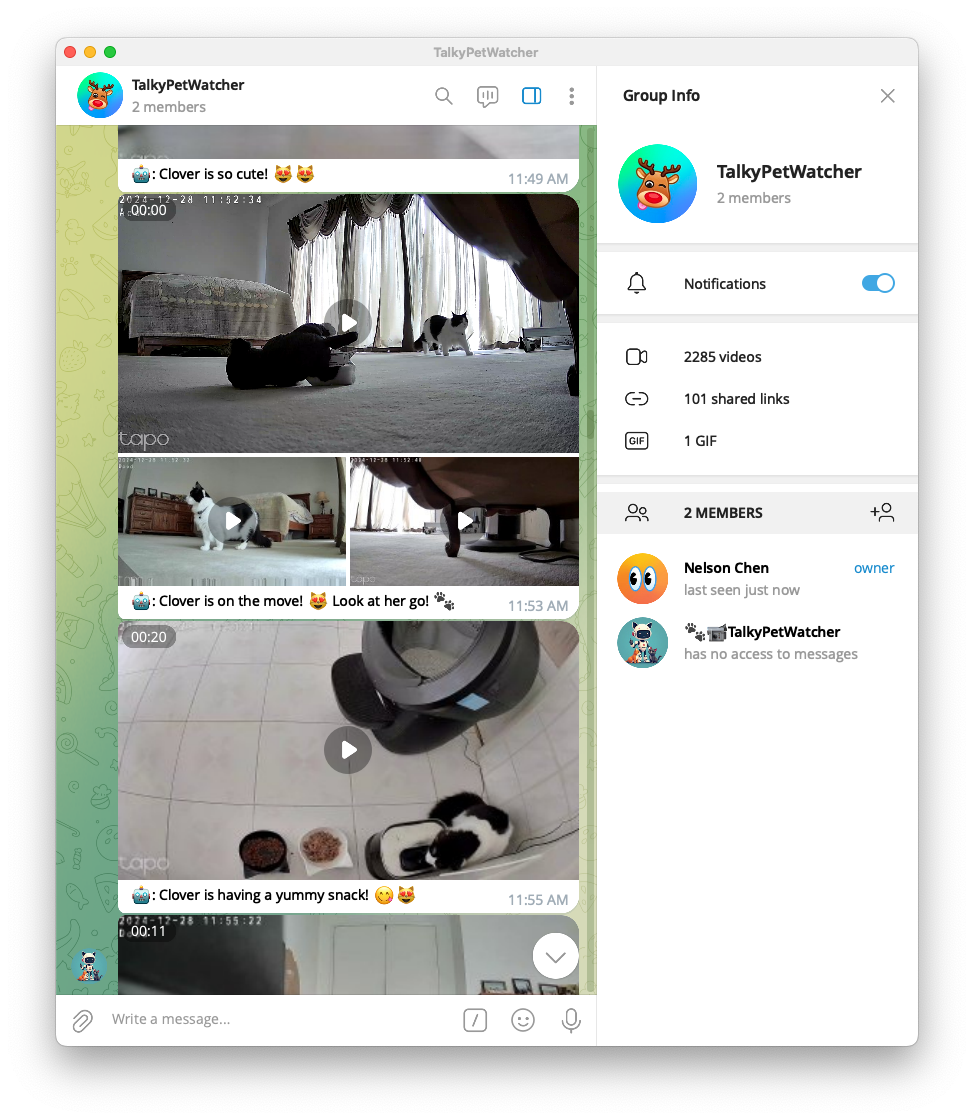
Github Project: https://github.com/nelsonjchen/talky_pet_watcher/
I’m allergic to cats 😢. But a friend asked me to watch their cat. My family was more than willing to help but to be safe, I wanted to also monitor the cat to make sure she didn’t get into any shenanigans that were too much.
With some cheap TP-Link Tapo cameras, I set up a system to watch the cat remotely and ensure she was safe while I could not be next to her. It’s a telegram bot that also sends me a message whenever the cat is doing something interesting.
It watches multiple cameras and tries to aggregate the data to provide insights on the cat’s behavior.
Here’s the project description:
Talky Pet Watcher is a tool to watch a series of ONVIF webcams and their streams. It captures video clips, uploads them to Google AI for processing, and uses a generative model to create captions and identify relevant clips. The results are then delivered to a Telegram channel. This project is designed to help pet owners keep an eye on their pets and share interesting moments with friends.
This was slapped together in a few days, as I only watched the cat for two weeks.
I was also interested in the Google Gemini AI and how cheap they claimed to be for analyzing video. I figured that this would be a good way to test it out.
What went well:
- The system was able to capture interesting moments effectively.
- It was able to concantate multiple camera’s POV to provide interesting views.
- The cameras were cheap!
- Putting the results on Telegram was a good way to share the results with the cat’s owner and friends.
What did not go well (and there are many!):
- I did not implement history, so the system basically reported the same thing over and over again.
- Getting reliable clips from multiple cameras when motion was detected was iffy due to the TP-Link Tapo camera’s iffy web servers. It would stall and halt a lot.
- The Google Gemini AI could only analyze video clips at 1FPS. For an agile kitten, this can sometimes make wrong assumptions about what the cat is doing.
- Implementation wise,
bun was very crashy and I had to restart it a lot.
- The connection to the camera also had to be restarted a lot.
If I had to do it again:
- Use something that can pull from a NVR by relative timestamps. There was some Rust NVR but it was too complicated for me to set up in the small amount of time I had.
- Implement a history system and maybe some memory bank system.
- And so so much more! 😅
🦾 comma three Faux-Touch keyboard
Long arms for those of us with short arms from birth or those who can’t afford arm extension surgery!

Built a faux-touch keyboard for the comma three using a CH552G microcontroller. The keyboard is off the shelf and reprogrammed to emulat a touchscreen.
It’s a bit of a hack but it certainly beats
gorilla arm syndrome while driving.
For $5 of hardware, it’s very hard to beat.
The journey started in January 2024 and ended in May 2024. Though it, I had to struggle with:
- CH552G programming
- Linux USB HID Touchscreen protocol
- Instructions and documentation
It’s also been through that period of unintended usage. The
Frogpilot project has had users who were surprisingly interested in using it as an alternative for some GM vehicles where there is no ACC button. They use the keyboard to touch the screen where ACC would be.
Part of the work also meant upstreaming to the the
CH552G community. While I doubt it’ll have any users, it’s nice to give back to the community. There is now a touchscreen library for the CH552G.
The project is open source and can be found at:
https://github.com/nelsonjchen/c3-faux-touch-keyboard
There’s a nice readme that explains how to build and flash the firmware.

The replay clipper has been ported to
Replicate.com!
https://replicate.com/nelsonjchen/op-replay-clipper
Along with it comes a slew of upgrades and updates:
- GPU accelerated decoding, rendering, and encoding. NVIDIA GPUs are provided to the Replicate environment and greatly speed up the clipper.
- Rapid fast downloading of clips. Instead of relying on
replay to handle downloads sequentially in a non-parallel manner, we use the parfive library to download underlying data in parallel.
- Comma Connect URL Input. No need to mentally calculate the starting time and length. Just copy and paste the URL from Comma Connect.
- Video/UI-less mode. Don’t want UI? You can have it.
- 360 mode. Render 360 clips
- Forward Upon Wide. Render clips with the forward clip upon the wide clip
- Richer error messages to help pinpoint issues.
- No more having to manage GitHub Codespaces. Replicate handles all the setup and cleanup for you.
Unfortunately, there is a cost. It’s a very small cost but technically Replicate.com is not free. Expect to drop a cent per render. Thankfully, you have a lot a trial credits to burn through and the clipper can run on a free-ish tier.

GitHub Link: https://github.com/nelsonjchen/Colorized-Project
On IntelliJ IDEs, I’ve been using
Project-Color to set a color for each project. This is useful for me because I have a lot of projects open at once, and it’s nice to be able to quickly identify which project is which.
Unfortunately, Project-Color
hasn’t been updated in a while, and it doesn’t work with the latest versions of IntelliJ.
After a few months of using IntelliJ without Project-Color, I decided to try to fix it. I’ve released the result as
Colorized-Project.
Thre are a few rough edges, but it’s mostly functional. I’ve been using it for a few weeks now, and it’s been working well. I’ve also submitted it to the JetBrains plugin repository as well.
It still needs some polish like a nicer icon, and I’d like to add a few more features.
It’s been near a year since I supercharged
GitHub Wiki SEE with dynamically generating sitemaps.
Since then a few things have changed:
- GitHub has started to permit a select set of wikis to be indexed.
- They have not budged on letting un-publically editable wikis be indexed.
- There is now a star requirement of about 500, and it appears to be steadily decreasing.
- Many projects have reacted by moving or configuring their wikis to indexable platforms.
As a result, traffic to
GitHub Wiki SEE has dropped off dramatically.

This is a good thing, as it means that GitHub is moving in the right direction.
I’m still going to keep the service up, as it’s still useful for wikis that are not yet indexed and there are still about 400,000 wikis that aren’t indexed.
Hopefully GitHub will continue to move in the right direction and allow all wikis to be indexed.
End to End Longitudinal Control is currently an “extremely alpha” feature in Openpilot that is the gateway to future functionality such as stopping for traffic lights and stop signs.
Problem is, it’s hard to describe its current deficiencies without a video.
So I made a tool to help make it easier to share clips of this functionality with a view into what Openpilot is seeing, and thinking.
https://github.com/nelsonjchen/op-replay-clipper/
It’s a bit heavy in resource use though. I was thinking of making it into a web service but I simply do not have enough time. So I made instructions for others to run it on services like DigitalOcean, where it is cheap.
It is composed of a shell script and a Docker setup that fires up a bunch of processes and then kills them all when done.
Hopefully this leads to more interesting clips being shared, and more feedback on the models that comma.ai can use.

There’s a web browser version of datasette called datasette-lite which runs on Python ported to WASM with Pyodide which can load SQLite databases.
I grafted the enhanced lazyFile implementation from emscripten and then from this implementation to datasette-lite relatively recently as a curious test. Threw in a 18GB CSV from CA’s unclaimed property records here
https://www.sco.ca.gov/upd_download_property_records.html
into a FTS5 Sqlite Database which came out to about 28GB after processing:
POC, non-merging Log/Draft PR for the hack:
https://github.com/simonw/datasette-lite/pull/49
You can run queries through to datasette-lite if you URL hack into it and just get to the query dialog, browsing is kind of a dud at the moment since datasette runs a count(*) which downloads everything.
Elon Musk’s CA Unclaimed Property
Still, not bad for a $0.42/mo hostable cached CDN’d read-only database. It’s on Cloudflare R2, so there’s no BW costs.
Celebrity gawking is one thing, but the real, useful thing that this can do is search by address. If you aren’t sure of the names, such as people having multiple names or nicknames, you can search by address and get a list of properties at a location. This is one thing that the
California Unclaimed Property site can’t do.
I am thinking of making this more proper when R2 introduces lifecycle rules to delete old dumps. I could automate the process of dumping with GitHub Actions but I would like R2 to handle cleanup.
Finally released GTR or Gargantuan Takeout Rocket.
https://github.com/nelsonjchen/gtr
Gargantuan Takeout Rocket (GTR) is a toolkit of guides and software to help you take out your data from Google Takeout and put it somewhere else safe easily, periodically, and fast to make it easy to do the right thing of backing up your Google account and related services such as your YouTube account or Google Photos periodically.
It took a lot of time to research and to workaround the issues I found in Azure.
I also needed to take apart browser extensions and implement my own browser extension to facilitate the transfers.
Cloudflare workers was also used to work around issues with Azure’s API.
All this combined, I was able to takeout 1.25TB of data in 3 minutes.
Now I’m showing it around on Twitter, Discord, Reddit, and more to users who have used VPSes to backup Google Takeout or have expressed dismay at the lack of options for users who are looking to store archives on the cheap. The response from people who’ve opted to stay on Google has been good!
I built https://cellshield.info to scratch an itch. Why can’t I embed a
spreadsheet cell?

You can click on that badge and see the sheet that is the data backing the
badge.
It is useful for embedding a cell from an informal database that is a Google
Spreadsheet atop of some README, wiki, forum post, or web page. Spreadsheets are
still how many projects are managed and this can be used to embed a small
preview of important or attention grabbing data.
It is a simple Go server that uses Google’s API to output JSON that
https://shields.io can read. Mix it in with some simple VueJS generator
front-end to take public spreadsheet URLS and tada.
I picked to base my implementation on shields.io’s as they make really pretty
badges and have a lot of nice documentation and options.
I run it on Cloud Run to keep the costs low and availability high. It also
utilizes Google’s implementation of authorization to get access to the Sheets API.
The badge generator web UI can also make BBCode for embedding (along with modern
Markdown and so on).
I’ve already used it for
this
and
that. The former outputs a
running bounty total and the latter is community annotation progress.
A major Game Boy development contest is using it labels to display the prize
pool amount: https://itch.io/jam/gbcompo21
Why I built this?
I built it for the
Comma10K
annotation project. I contributed the original badge which attempted to use a
script that was used in the repo to analyze the completion progress.
Unfortunately, this kept on diverging from the actual progress because the human
elements kept changing the structure and organization and I had the badge
removed. The only truth is what was on the spreadsheet.

Popularity
Compared to my other projects, I don’t think the popularity will be too good for
this project though. I think it might have a chance to spread via word of mouth
but it’s not everyday that a large public collaborative project is born with a
Google Spreadsheet managing it. The name isn’t that great either as it probably
conflicts with anti-wireless hysteria. Also, it’s not like there’s an agreed
upon community of Google Spreadsheet users to share this knowledge with.
I also shamelessly plugged it here but I think the question asker might be
deceased:
https://stackoverflow.com/questions/57962813/how-to-embed-a-single-google-sheets-cells-text-content-into-a-web-page/68505801#68505801
At least it was viewed 2,000 times over the last two years.
Maintenance
It’s on Cloud Run. The cost to keep it running is low as it sometimes isn’t even
running and the Sheets V4 API it uses was recently declared
“enterprise-stable”.
Because of this, it will be super easy to maintain and cheap to run. I don’t
expect any more than $2 a month.


